|


Mieke, heel erg bedankt voor je toestemming om je tutorials te mogen vertalen.
Thank you Mieke, for your permission to translate your beautiful tutorials.
Click on the banner for the original lesson

This tutorial was made in PSP 9, but can also be made in the other versions.
For this lesson you need Animation Shop (AS)
and the following plugins:
Alien Skin Eye Candy 5: Impact - Glass
Alien Skin Eye Candy 5: Textures - Marble
You can download the plugins

Place or install the plugins in your Plugin folder.
 you can download the materials.
It contains: 9 tubes - 1 selection - 1 font.
Place the selection in your Selection folder.
Open the font and minimize it.
The tubes are by Mieke B.
The other tubes are unknow to me.
If they are yours, please
let me know
so I can give you the proper credit.
Thank you so much for your beautiful tube.
Step 1
Open the tubes in PSP - minimize them for now.
Set your foreground color to #e7e3e4 - or at your choice.
Set your background color to #1d5126 - or at your choice.
Set your foreground to gradient 'Radial' - with these settings:

Open a transparent image of 800 x 600 pixels.
Flood fill this image with your gradient.
Step 2
Click on your Selection tool - Rectangle.
Custom Selection - with these settings:

Effects - Plugins - Alien Skin Eye Candy 5: Textures - Marble
- click tab Settings - choose Fractured - Emerald - with these settings:


Step 3
Selections - Invert.
Layers - New raster layer.
Flood fill this layer with your background color.
Adjust - Add/remove noise - Add noise - with these settings:

Layers - Merge - Merge down.
Selections - Invert.
Effects - 3D effects - Drop shadow:
Vert -2 (minus 2) - Hor -4 (minus 4) - Opacity 80 - Blur 30 -
color black.
Selections - Select none.
Step 4
Layers - New raster layer.
Selections - Load/save selection - Load selection from disk - load selection 'kerstles-04-1-2012' - with these settings:

Set your background color to #d61a1e (red).
Change your gradient with this color - same settings.
Flood fill the selection with this gradient.
Set the Blend mode of this layer to Color (Old).
Lower the Opacity of this layer to 60.
Step 5
Layers - New raster layer.
Set your background color back to #1d5126.
Selections - Modify - Contract - 20 pixels.
Flood fill the selection with your first gradient.
Set the Blend mode of this layer to Overlay.
Lower the Opacity of this layer to 55.
Step 6
Layers - New raster layer.
Set your background color to red #d61a1e.
Selections - Modify - Contract - 20 pixels.
Flood fill the selection with your second gradient.
Set the Blend mode of this layer to Overlay.
Step 7
Layers - New raster layer.
Set your background color back to #1d5126.
Flood fill the selection with your first gradient.
Effects - Plugins - Alien Skin Eye Candy 5: Impact - Glass -
click tab Settings - choose 'Clear', No Drop Shadow - see image below:

Lower the Opacity of this layer to 80.
Selections - Select none.
Step 8
Copy tube 'rand-101--2012-mb'.
Paste as a new layer on your working image.
Effects - Image effects - Offset - with these settings:

Set the Blend mode of this layer to Luminance (L).
Step 9
Open tube 'tekst-ster-mb-2012'.
Copy layer 3 (white text).
Paste as a new layer on your working image.
Image - Resize - 50% - All layers not checked.
Adjust - Sharpness - Sharpen.
Effects - Image effects - Offset: 250 - 0 - Custom and
Transparent checked.
Layers - Duplicate.
Effects - Image effects - Offset: 0 - 275 - Custom and
Transparent checked.
Step 10
Activate layer 7 (the star in the middle).
Layers - Duplicate.
Effects - Image effects - Offset: 0 - -275 (minus 275) -
Custom and Transparent checked.
Step 11
Copy tube 'Deco-04-2012'.
Paste as a new layer on your working image.
Place them on top of your crea.
Step 12
Copy tube 'kerstboom-wit-04-2012'.
Paste as a new layer on your working image.
Effects - Image effects - Offset: 405 - 0 - Custom and
Transparent checked.
Effects - 3D effects - Drop shadow:
Vert and Hor 5 - Opacity 70 - Blur 50 - color black.
Step 13
Copy tube 'kerstbal-73'.
Paste as a new layer on your working image.
Effects - Image effects - Offset: 0 - 60 - Custom and
Transparent checked.
Effects - 3D effects - Drop shadow - same settings as before.
Step 14
Copy tube 'kerstbal-87'.
Paste as a new layer on your working image.
Effects - 3D effects - Drop shadow - same settings as before.
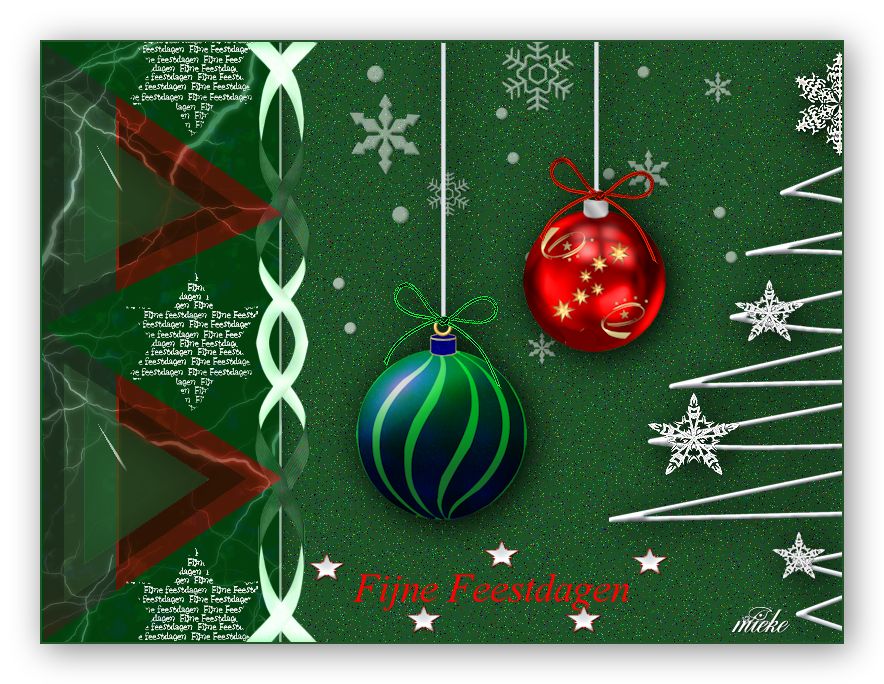
Place this ball on the right side - see main image.
Step 15
Image - Add borders - Symmetric - 2 pixels - background color.
Image - Add borders - Symmetric - 40 pixels - color white.
Select this border with your Magic wand - Feather and
Tolerance to 0.
Selections - Invert.
Effects - 3D effects - Drop shadow:
Vert and Hor 5 - Opacity 50 - Blur 50 - color black.
Selections - Select none.
Step 16
Copy tube 'tekst dutch' - 'text english' - or 'text empty'.
The font is included, so you can type your own text in the
stars.
Paste as a new layer on your working image.
Place it at the bottom of your crea.
Step 17
Save your crea as a jpg file and you're done!
I hope you enjoyed making this lesson.
Hugs Mieke
This lesson was written by Mieke.
This lesson is and remains the property of Mieke.
You are not allowed to copy or distribute her lessons without her written
permission.
All her lessons are self designed ... so any agreement is purely coincidental.
Translated by Zial on December 5, 2015
Back
|